Cookie
FlexiHub Team uses cookies to personalize your experience on our website. By continuing to use this site, you agree to our cookie policy. Click here to learn more.

What is a Virtual Dongle, and How Do I Create One?

Olga Weis Olga Weis Last updated Aug 4, 2023

USB Dongles (or HASP keys) are hardware devices that are used to protect proprietary software from unauthorized usage. Users need to have the necessary dongle attached to their computer’s USB port to access all the features of a protected piece of software.

In this post, we are going to show you how to create a virtual USB dongle and avoid the inconvenience of carrying multiple keys for several software applications. When you virtualize a USB dongle, you also free up ports on your computer and extend the physical dongle’s lifespan by minimizing wear and tear on the device.

How to virtualize a USB dongle key with FlexiHub

FlexiHub is a user-friendly software service that facilitates the sharing of USB dongles over the Internet. With FlexiHub, you can make local USB devices available over the network and access network-attached peripherals from any location.

The software employs advanced virtualization technology to virtualize USB devices. FlexiHub converts USB data to TCP/IP packets that can be transmitted to a computer attached to the network. The tool then takes the data packets and converts the information back into USB format. FlexiHub lets you share USB devices over the network, no matter where they are located.

Step-by-step instructions on how to make a virtual dongle

1
Register for a free FlexiHub account to get a free demo of the tool.
2
Download FlexiHub and install it on the computer with a physically connected USB device you want to share. You also need to install the software on all machines that will remotely access the device over the network. After installation, start the program and log into your FlexiHub account.
 Your FH login credentials are the same email and password you’ve used to register your FlexiHub account
3
Using the FlexiHub application on a remote computer, locate the USB device you want to access. Click the “Connect” button to establish communication with the virtual dongle.
 FlexiHub has a very user-friendly interface

It’s that easy! That’s all you need to do to share a local USB device with network-attached remote machines anywhere in the world. The virtual devices appear in your computer’s Device Manager.

At the top pane, you’ll see your locally-attached USB devices. The bottom pane shows remote USB devices you can connect to your machine.

FlexiHub Pros and Cons


Pros

  • The built-in FlexiChat feature enables easy real-time text communication between multiple users logged into a single FlexiHub account.
  • FlexiHub supports multiple protocols like RDP, allowing you to select the one that works best in your environment.
  • FlexiHub is compatible with major virtual environments such as Microsoft Hyper-V, VMWare, QEMU, Citrix XenDesktop, Windows Virtual PC, and ESX.

Cons

  • The free demo version of the tool limits the time and number of devices you can connect. An annual subscription is required to access all of FlexiHub’s features.
  • You need to have a fast and reliable Internet connection to obtain good performance from FlexiHub.

How to create a virtualized USB dongle key with Donglify

Donglify is a software solution that specializes in digital certificate USB dongle sharing over the Internet. The tool enables remote users to share the functionality of a single physical dongle. Donglify also helps you protect physical dongles from damage or loss.

Using virtual dongles with Donglify requires you to install the software on the machine with a direct connection to the physical dongle as well as all remote computers that will access the virtual device. Remote users then log into the same Donglify account as the one used to connect the shared security key to the network.

How to make a virtual dongle with Donglify

1
Create a Donglify account to access the software’s features. Then download and install the application on the computer with the physically plugged dongle. This machine will be your server. Donglify needs to also be installed on the client computers that will be accessing the shared dongle remotely.
 To install Donglify, follow the on-screen instruction of Setup Wizard
2
After installation, launch Donglify on the server and use your account credentials to log in. Click the “+” sign in the window to view the list of shareable USB dongles.

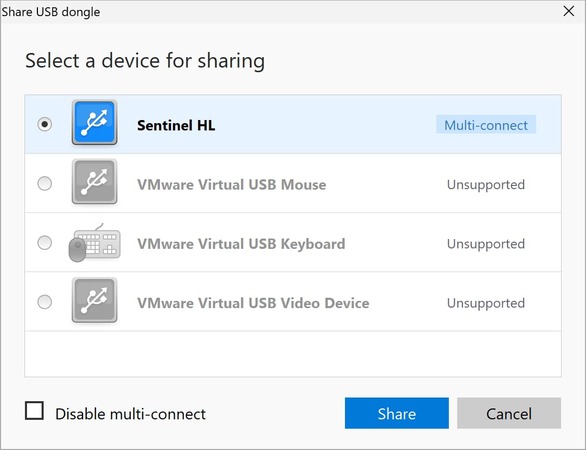
Note: The shareable USB dongles will have a text box next to their name that states if the device is available for "Multi-connect" or "Single-connect" usage. Multiple users can share a dongle simultaneously with "Multi-connect" devices. “Single-connect" dongles are limited to one connection.
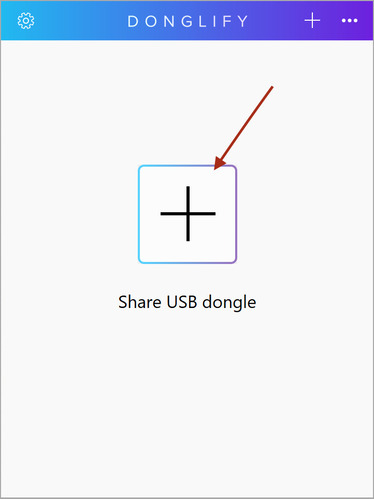
 The + button is at the center of Donglify’s start tab
3
Check the box next to the elected USB dongle and click the “Share" button to make the device available to remote connections.
 If you see Single-connect next to the dongle you need to share with multiple machines simultaneously, send us a request, and we’ll make it muli-connect-ready for you
4
Run Donglify on a client machine and use the same credentials to log in. You will see a list of available security keys that can be shared.
 USB keyboards and mouses are not available for sharing with Donglify
5
Select the dongle you want to use and click “Connect.”
 Connect the dongle

You’re done! The client machine will now recognize the shared USB security key as if it had a direct connection to the device. Donglify makes it easy to create, share, and use virtual dongles.

Pros and Cons


Pros

  • Eliminate the inconvenience of waiting for access to a physical dongle.
  • Reduce the costs of replacing damaged physical dongles.
  • Simultaneously access all popular dongle brands remotely.

Cons

  • All computers used to share dongles with Donglify need fast and reliable Internet connectivity.
Start your free trial today
7-day Trial • Cancel anytime.
Already a Donglify user? Sign In →