Cookie
FlexiHub Team uses cookies to personalize your experience on our website. By continuing to use this site, you agree to our cookie policy. Click here to learn more.
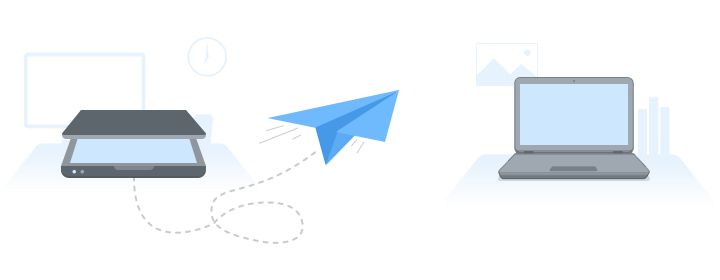
share scanner over network
Olga Weis Olga Weis Last updated May 9, 2024

How To Share Scanner Over Network: Definitive Guide

The ability to efficiently share peripheral devices such as scanners over a network is essential in today’s connected business landscape. Having a scanner available to multiple users enhances productivity in large and small office environments. Additional benefits are achieved when the devices can be accessed using various operating systems such as macOS or Windows 10 and 11.

This guide discusses sharing a scanner over the internet, making the peripheral accessible to remote, network-connected users. We’ll help you identify solutions to your unique device-sharing needs on Mac and Windows computers so you can get the maximum value from your scanners and other peripheral equipment.

Scanner Sharing—Software Method

The easiest way would be to use FlexiHub, which lets you share and connect remote scanners over the network. The software supports various kinds of USB and serial devices: scanners, printers, keyboards, Bluetooth adapters, etc. The app is easy-to-use and works with Windows, macOS, Linux, and Android platforms.
FlexiHub
4.8 Rank based on 386+ Reviews
With FlexiHub, you can easily link remotely-located machines with USB peripherals connected to a local computer. The setup process is straightforward and you don't need to be tech-savvy. Once you create and set up your FlexiHub account, all peripherals connected to the local computer will show up in the interface and you will be able to access them remotely.

How to Share USB Scanner across the Network

Here are the straightforward instructions on how to share a USB scanner over the network with FlexiHub's help:
  • 1.
    Sign up for a FlexiHub account here and start a free demo. blank
  • 2.
    Install the software on each of your PCs that need access to a shared scanner. blank
  • 3.
    Then start FlexiHub on every computer that will connect to a scanner and enter your login credentials. blank
  • 4.
    In the FlexiHub window on another computer find the USB scanner and click "Connect".
    share scanner over network flexihub
  • 5.
    Here you go! Now the scanner is recognized as if it was plugged in directly to your computer. blank
Here’s a detailed video guide on how to share scanner with FlexiHub:

How to Add Scanner in Windows 10

Windows offers built-in functionality to share a scanner with other computers or set it up as a wireless scanner on your network. With this feature, a scanner attached to one of your networked devices can be accessed from any other computer on your local network or Wi-Fi.

When you connect a scanner to your device or add a new scanner to your home network, you can usually start scanning pictures and documents right away.

If your scanner does not install automatically, here are some instructions to help you add a scanner in Windows 10 properly:
  • 1.
    First, plug in your scanner’s USB cable to a computer connected to the network or the USB port of a router or modem.
  • 2.
    Then turn the scanner on. Windows should automatically install the scanner drivers and configure the device to work.

    In most cases, these steps are enough to set up a local scanner or discover a scanner connected to the network. If that doesn’t work, here’s a way to do it manually.

  • 3.
    Navigate Start > Settings > Devices > Printers & scanners.
    add scanner windows 10
  • 4.
    Click “Add a printer or scanner”. This will start the search for all available scanners on the network. Once done, select the one you want to use from the list and click “Add Device”.

    Note: If your scanner is included in a multifunction or All-In-One printer, you may only see the name of your printer. To see your scanner, under Printers & scanners, select your installed printer, select Manage, and then choose your scanner.


    If your scanner isn't in the list, select The printer that I want isn't listed, and then follow the instructions to add it manually.

    Note: Please make sure that you're connected to the same network as the scanner for your PC to find and install it. Also, you might need administrator permission to install some scanners.
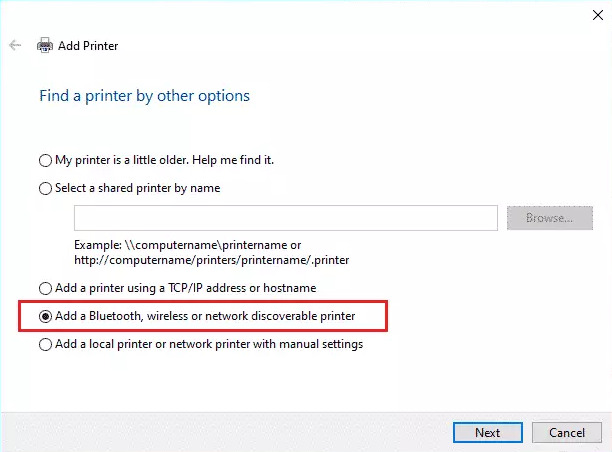
    add scanner manually windows 10
  • 5.
    To verify your scanner is installed successfully, look for it under Printers & devices.

How to Connect Scanner to Windows 11

Newly released Windows 11 comes with a host of new features and an updated graphical user interface, including start menu and taskbar improvements. When it comes to adding a scanner to Windows 11, the process is somewhat similar to the one in Windows 10, except for some minor differences.

When you connect a scanner to your device, Windows 11 should automatically install the scanner drivers and configure it to work so you can start scanning pictures and documents right away.

If that doesn’t work, to install the scanner manually, you need:
  • 1.
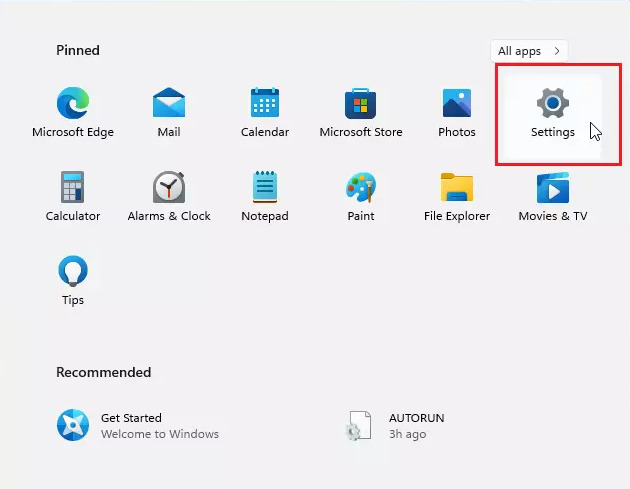
    Go to Start > Settings.
    settings windows 11
  • 2.
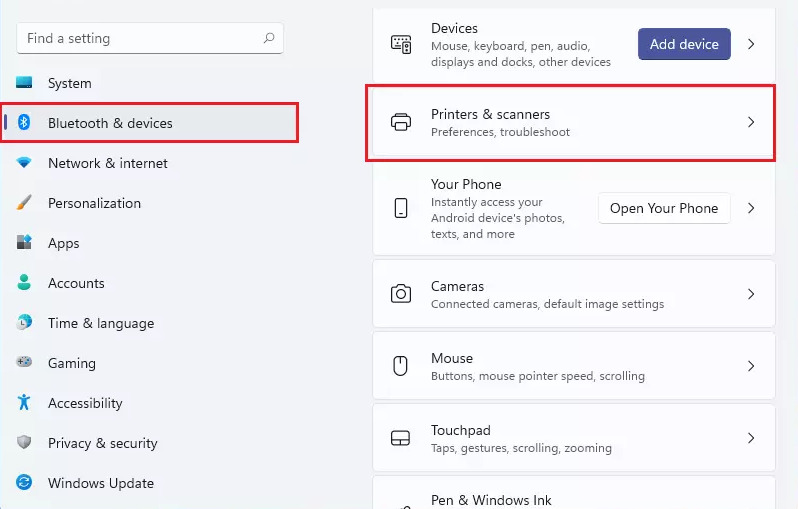
    Next, select Bluetooth & devices at the left sidebar, and click Printers & scanners.
    bluetooth & devices windows 11
  • 3.
    On the Printers & Scanners page, click the “Add Device” button.
    add scanner windows 11
  • 4.
    Windows 11 will start searching and display all scanners available on your network.
  • 5.
    Choose the desired scanner and click “Add device”.

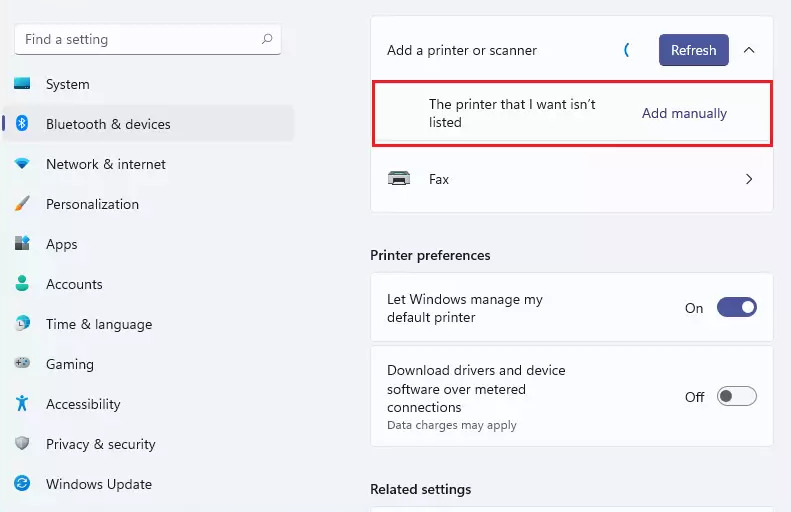
    If the scanner is not listed, you will need to add the driver manually. For this, click “Add manually” and follow the instructions.
    add scanner manually windows 11

How to Set Up Scanner on Mac

Scanning documents on a macOS system is a straightforward process. Before attaching the scanner, update macOS with the latest scanning software.

When using an AirPrint-compatible scanner, you can avoid downloading or updating device drivers. Your Mac automatically detects AirPrint-compatible devices connected to your local network and makes it easy to use them. AirPrint supports many printing and scanning devices that easily integrate with your Mac’s operating system.

Here is how to connect a scanner to Mac:
  • 1.
    Connect the scanner to your Mac and turn it on.

    Note: you don't need to install any additional software, your Mac will take care of it and download it automatically.

  • 2.
    Click the Apple icon in the upper left corner and open “System Preferences”.
  • 3.
    Head into the “Printers & Scanners” menu and select your scanner.
    printers & scanners macos
  • 4.
    If your scanner is not listed, click the “+” button. From the pop-up menu, select "Add Printer or Scanner".
    add printer macos

Technical Tips and Troubleshooting Scanners

Technical Tips

Following are some tips to facilitate sharing a scanner over a network.

  • • Network Configuration - All devices that will share the scanner need to be connected to the same network. You may need to configure router or firewall settings on the computers so they can access the shared scanner.

  • • Dedicated IP Addresses - Consider assigning a static IP address to the host computer attached to the scanner. A dedicated IP address will help limit connectivity issues as it will not change when the machines restart.

  • • Secure Connectivity - Use encrypted connections if they are supported by the scanning software, especially if you are working with sensitive or valuable documents.

  • • Scanner Drivers - Install the most current scanner drivers on the host machine. You may also have to install new drivers on the client computers that will share the device.

Troubleshooting

Here are some tips to help troubleshoot problems with scanner sharing over the network.

  • • Scanner not detected - If client computers cannot access the shared scanner, you should check all network connections and firewall settings on the client and host. Make sure your firewall is not blocking the scanner-sharing software.

  • • Driver issues - Limited scanner functionality may be the result of obsolete or incorrect drivers. Reinstall the drivers on the host and verify if the client needs dedicated drivers.

  • • Incompatibility - You may run into issues with older scanners that are not compatible with network sharing. You can obtain network compatibility information by visiting the manufacturer’s website.

  • • Poor performance - Inconsistent scanning performance can be due to insufficient network throughput. Verify the network can support the necessary throughput for scanning. If you are using a Wi-Fi network, consider upgrading to a 5GHz band for better speed and performance.

The preceding tips should help you set up and troubleshoot scanner sharing over a network. You should consult the user manuals for any software and equipment for specific information that may resolve other issues you encounter.

Summing Up

Now that you know how to connect the scanner to your Windows and macOS devices, you can easily use your scanner over a network and speed up your workflow. Try the methods above and choose the one that works best for you. If you're looking for an easy and convenient way to share your USB scanner, FlexiHub is worth considering. FlexiHub features full compatibility, a wide range of features, and minimal requirements.

Share webcam over network
  • 4.8 overall rank based on 386+ Reviews
  • Requirements: Windows, macOS, Linux, Android and Raspberry Pi.
  • 10.45MB Size.
  • Version 6.1.15025. (19 Feb, 2024).
  • Pricing starts $14 per month billed annually